![]()
![]()
Table of Contents
| Table of Contents | ||||
|---|---|---|---|---|
|
Uploading Media to Kaltura
You can use the Kaltura MediaSpace to upload videos and other types of media, organize media into channels and playlists, and then share media and media collections via links and embedding directly into Blackboard. The following uploading options are available:
- Manual Media Upload is for videos you've created with another application that you are ready to put it into Kaltura to stream via the web.
- Kaltura
| title | Install Personal Capture |
|---|
To install Personal Capture on your desktop:
Log into Kaltura MediaSpace, at the upper right, click the area that says Click Here To Login ( ), and then select . When prompted, log in with your NetID and password.
At the top right, click , and then select .
| Info |
|---|
| Note: You may need to expand your browser window to see all available options. |
When the download is complete:
When the installation is complete, return to Kaltura MediaSpace; then, to launch the software, click , and then select again.
| Warning | ||||
|---|---|---|---|---|
| ||||
Note: If you have a computer issued to you by a school, college, or department, please contact your Distributed Staff Personnel (DSP) for instructions on how to install the Kaltura Personal Capture client on your machine.
|
| Expand | ||
|---|---|---|
| ||
Kaltura Personal Capture lets you record video and audio from multiple sources. To select sources, in the "Kaltura Personal Capture" window, click each of the three drop-down menus and choose the cameras, screens, or microphones you wish to record. For instructions with screenshots, see Kaltura Capture User Guide . |
Using Kaltura Capture on a Mac
As macOS increases its privacy and security settings for Apple's operating systems, running Kaltura Capture on macOS may require enabling additional permissions. Please use the instructions in the link below if you are seeing errors while trying to record using Kaltura Personal Capture on macOS.
Kaltura Personal Capture macOS SettingsClosed-Captioning
Machine captioning is performed automatically on all videos uploaded to Kaltura (video.syr.edu). This process uses automatic machine generated transcription (ASR) that recognizes the words spoken in your video and provides machine-based captions with 75-85% accuracy.
Live Captioning
While third party speech-to-text products, such as Otter.ai, exist for live-captioning, ITS recommends that professional captioning be used whenever an accommodation is requested or whenever our policy requires that an event has live captioning.
See Guidelines for CART and ASL Interpreting for more information.
Download Media from Kaltura
You can use the Kaltura MediaSpace to download your previously captured and uploaded videos.
| title | Downloading from KMS |
|---|


Kaltura Express Capture
Recording with Kaltura Express Capture lets you make basic recordings in Kaltura. Unlike Kaltura Personal Capture and Lecture Capture (coming soon), Express Capture does not require the installation of any software on your computer. You can access Kaltura Express Capture via Kaltura MediaSpace or via Blackboard.
| title | Quick recording with Kaltura Express Capture |
|---|
| Warning | ||
|---|---|---|
| ||
|
To use Express Capture in Kaltura MediaSpace:
On Kaltura MediaSpace, at the upper right, click the area that says Click Here To Login (), and then select . When prompted, log in with your NetID and password.Click , and then select .
| Info |
|---|
Note: You may need to expand your browser window to see all available options. |
- : Click this to discard your recording and immediately begin a new one.
- : Click this to upload your recording to MediaSpace. After clicking, enter a title, and then click .
- : Click this to download your recording locally.
- Capture will launch the Kaltura Desktop Recorder, an application that can be installed on your machine to make recordings of your desktop screens or applications and cameras attached to your computer. The recording is created on our computer's hard drive and can be uploaded from the application directly to your Kaltura media library.
- Express Capture allows you to use microphones and cameras connected to your device to record into the web browser and upload it directly to your Kaltura media library.
- YouTube creates a media item in your library based on a video hosted on YouTube. This feature allows you to sort and organize course media in a single location, post to your course with the Kaltura tools, and have YouTube videos play via the Kaltura Player which can remove some ads and provide Kaltura analytics for the item. Please note that the original video source video remains on YouTube and plays through Kaltura. If it is removed from YouTube by the owner, the Kaltura item will no longer work.
- Kaltura Quiz links to a page where you can either select an existing video in your library or upload a new video to use as the basis for quiz built on top of the video. SU users interested in this feature are encouraged to consider PlayPosit which allows you to create interactive videos from the items in your Kaltura media library.
| Info | ||
|---|---|---|
| ||
Kaltura is designed as a streaming platform for active media content. Each entry remains in the system for four years from the last time was played for at least 30 seconds or, if never played, from the date it was uploaded. To retain entries that are not being played regularly, content owners should download a copy of the media and hold it in storage outside of Kaltura. |
Manual Media Upload
Follow the instructions below to manually upload media you've created with another application that you are ready to put it into Kaltura to stream via the web.
| Expand | ||
|---|---|---|
| ||
To upload a file manually:
|


Kaltura Personal Capture (Desktop Client)
Kaltura Personal Capture is a desktop application that helps you record presentations using any combination of voice, webcam video, screen action, and PowerPoint slides. You can then upload and manage your recordings alongside other Kaltura content in the Kaltura MediaSpace.
| Expand | |||||||||
|---|---|---|---|---|---|---|---|---|---|
| |||||||||
To install Personal Capture on your desktop:
|
| Expand | ||
|---|---|---|
| ||
Kaltura Personal Capture lets you record video and audio from multiple sources. To select sources, in the "Kaltura Personal Capture" window, click each of the three drop-down menus and choose the cameras, screens, or microphones you wish to record. For instructions with screenshots, see Kaltura Capture User Guide . |
| Note | ||
|---|---|---|
| ||
As macOS increases its privacy and security settings for Apple's operating systems, running Kaltura Capture on macOS may require enabling additional permissions. Please use the instructions found on the Kaltura Personal Capture macOS Settings page if you are seeing errors while trying to record using Kaltura Personal Capture on macOS. |
Kaltura Express Capture in KMS
Kaltura Express Capture allows you to record videos from your browser without installing additional software on your computer via Kaltura MediaSpace or via Blackboard. Recent updates include the ability to record your screen as well as your camera to create a dual-stream video where viewers can choose how the streams are displayed to them.
Express Capture is only supported on laptop and desktop computers. It is not available on mobile devices. For mobile devices, use the video camera option on your device and upload the content using the media upload option.
Additional instructions are available from Kaltura.
| Expand | ||||||||||
|---|---|---|---|---|---|---|---|---|---|---|
| ||||||||||
To use Express Capture in Kaltura MediaSpace:
|
Closed-Captioning
Machine captioning is performed automatically on all videos uploaded to Kaltura (video.syr.edu). This process uses automatic machine generated transcription (ASR) that recognizes the words spoken in your video and provides machine-based captions with 75-85% accuracy.
Live Captioning
While third party speech-to-text products exist for live-captioning, ITS recommends that professional captioning be used whenever an accommodation is requested or whenever our policy requires that an event has live captioning.
See Guidelines for CART and ASL Interpreting for more information.
Deleting Captions and/or Transcripts
Users can choose to delete captions or transcripts from media.
| Note | ||
|---|---|---|
| ||
Kaltura may take a few hours to a day to completely remove captions and transcripts from media files once deleted. Kaltura may take a day or so to completely remove the transcript from media files once deleted. If you delete a caption file, we also recommend that you also delete the corresponding transcript file, and vice-versa. |
| Expand | ||
|---|---|---|
| ||
|


Requesting Captions in Other Languages
Media owners can request captions be processed for their videos in additional languages. Supported languages include Arabic, English, French, German, Hebrew, Italian, Russian, and Spanish.
| Info | ||||
|---|---|---|---|---|
| ||||
The Machine Captioning process takes approximately 24-48 hours. You will receive an email notification when the process if completed. |
| Expand | ||
|---|---|---|
| ||
|


Download Media from Kaltura
You can use the Kaltura MediaSpace to download your previously captured and uploaded videos.
| Expand | ||
|---|---|---|
| ||
|
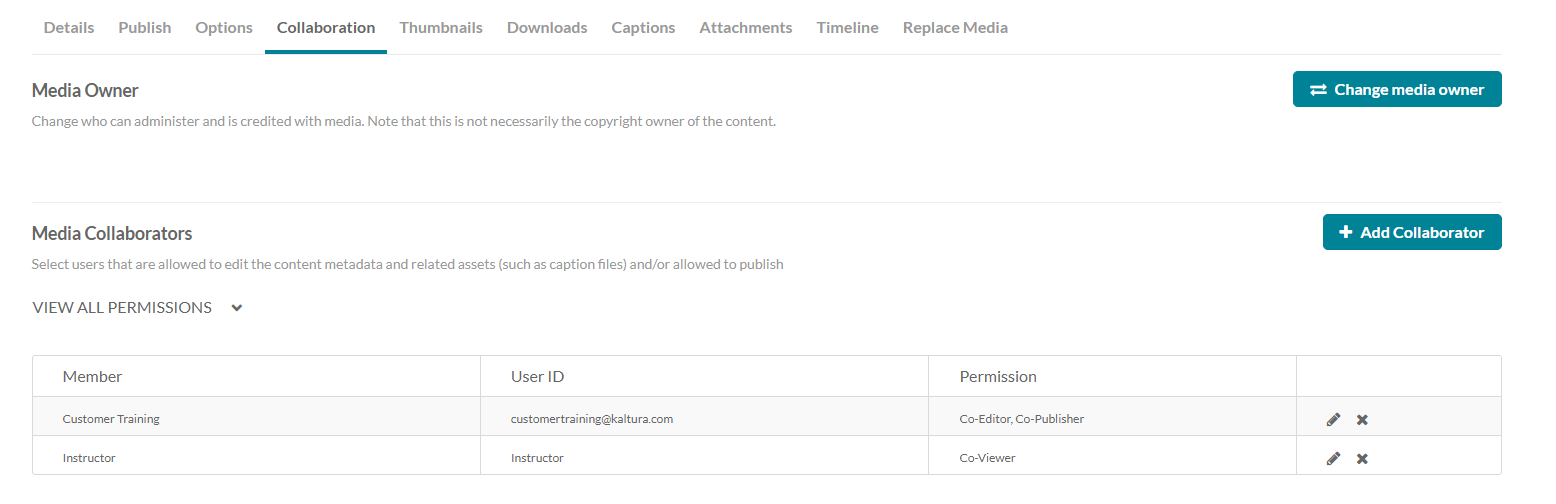
Changing Media Ownership
| Expand | ||
|---|---|---|
| ||
Media owners can change the media ownership (for example in case the owner is leaving the organization and someone needs to take ownership of the media). They can also add co-editors, co-publishers, co-viewers to their media. Owners can also be groups created within Kaltura. Sign in - video.syr.edu rather than Blackboard Login and Click on My Media. Click on the video you want to transfer to a new owner. Under the Actions dropdown, select Edit. Click on the Collaboration tab. Click Change media owner. Enter the username or group for the new owner. Click Save. |


My Channels in Kaltura
In Kaltura, a channel is a collection of videos and other media that can be public or restricted in terms of who can view and contribute media to the channel. Channels are useful for aggregating a large number of videos on the same topic or theme, or for sharing a collection of similar or diverse videos with a specific audience.
| Expand | ||
|---|---|---|
| ||
To create a channel for your course:
|
| Expand | ||
|---|---|---|
| ||
To add users to your channel:
|
| Expand | ||
|---|---|---|
| ||
You can add media to a channel in several ways: By publishing media to a channel when you upload it, or by selecting it and adding it at a later time. To add media to your channel:
|
Create a New or Add to an Existing Playlist
Kaltura playlists are static lists of videos that can be accessed within Kaltura or embedded into Blackboard. For others to view videos in your playlists, the videos must be either unlisted or published to a Kaltura category or channel that your audience has permission to view.
| Expand | ||
|---|---|---|
| ||
To add items to a new or existing Kaltura playlist:
When the media item is added successfully to your playlist(s), you'll see a green verification message (e.g., "Media added to selected playlist(s): Playlist 1 , Playlist 2"). You may add additional items to your playlists at any time. |
Viewing Media Analytics
Kaltura allows users to view the analytics of individual videos they own or co-own. The details include the video’s performance over time, engagement, access by country, and device overview.
| Expand | ||
|---|---|---|
| ||
|

Accessing Zoom Recordings
(Coming Soon)If you use Zoom to make a cloud recording of your meeting, the Zoom recording will automatically be copied to your Kaltura My Media.
Please note, the video will not start converting in Kaltura until it has full uploaded in Zoom Cloud.
To access the Kaltura copy, please follow to steps above to view My Media in Blackboard or go to the Kaltura MediaSpace.
Kaltura How-To Instructions
Kaltura has a wide range of support documentation for Kaltura MediaSpace and can be found here:
Kaltura MediaSpace Go (KMS GO) Mobile App
Android and iOS users can download and use the KMS GO App from the Google Play Store and the Apple App Store.
For additional details, including first time login, please visit the Kaltura MediaSpace Go Mobile App page.
Kaltura Recycle Bin Restore
| Expand | ||
|---|---|---|
| ||
https://knowledge.kaltura.com/help/how-to-restore-items-from-the-recycle-bin |
Kaltura Media Stitching
| Expand | ||
|---|---|---|
| ||
| Tip |
|---|
Need Help? Contact the ITS Help Desk seen days a week by calling 315.443.2677, emailing help@syr.edu, or stopping into 1-227 Center for Science and Technology (Hours of Operation). |